Support and Resistance Strategy on Binany: How to Trade Key Price Levels
Support and resistance trading is the foundation of everything in price action analysis. Before you apply any indicator, any strategy, or any pattern, you need to know where the market has made decisions before — because those same price zones tend to matter again
Support and resistance trading is the foundation of everything in price action analysis. Before you apply any indicator, any strategy, or any pattern, you need to know where the market has made decisions before — because those same price zones tend to matter again. On Binany, where every trade is a directional call, knowing how to identify support and resistance levels gives you a structural map of where price is likely to bounce or break. This guide walks you through how to draw levels correctly, how to trade them, and how to filter out the setups that look right but aren’t.
What Are Support and Resistance Levels?
Support is a price zone where buying pressure has historically exceeded selling pressure. When price drops to this zone, buyers step in — demand outweighs supply — and price bounces back up. Resistance is the mirror image: a zone where sellers consistently overpower buyers, pushing price back down when it rises into that area.
These levels form for straightforward reasons. Every time price reverses at a certain point, traders remember that level. Next time price approaches it, the same reaction tends to repeat — buyers defend support, sellers defend resistance. The more times a level has been tested and held, the more significant it becomes. A support level tested four times carries far more weight than one tested only once.
Key support and resistance levels typically form at three places: previous swing highs and swing lows (the obvious turning points on the chart), round numbers (prices like 1.1000, 1.2000, 1.0800 attract natural attention from traders and institutions), and consolidation zones where price moved sideways for an extended period before breaking out.
These aren’t exact lines — they’re price zones. A level that held at 1.0815 last month might hold at 1.0808 or 1.0822 this month. Trading support and resistance well means thinking in zones, not lines.
How to Draw Support and Resistance Lines Correctly
Most beginners draw too many levels, clutter the chart, and end up confused. The goal is to identify the four to six most significant horizontal levels on a clean chart — the ones any experienced trader would mark without hesitation.
Follow these four steps:
- Switch to a higher timeframe first. Open the H1 or M30 chart for your chosen asset. Higher timeframes reveal the most significant levels because they represent where the largest volume of traders made decisions. Levels visible on H1 are more meaningful than those only visible on M5.
- Identify the obvious swing highs and swing lows. A swing high is a candle that peaks higher than the candles on both sides of it. A swing low is the reverse — a candle that dips lower than its neighbors. Scan the last 2–3 months of price history and mark the clearest turning points. Don’t mark every minor wiggle — only the ones where price clearly changed direction.
- Draw horizontal lines at price clusters. When you see multiple swing highs or lows grouped near the same price area, that’s a significant zone. Draw a horizontal line through the body of those candles — not necessarily through the wick tips. Bodies show where price consistently opened and closed; wicks show temporary overextension.
- Verify the level has been tested at least twice. A single swing high or low might be coincidence. Two or more tests at the same zone confirm that the level is real and respected by the market. Three or more tests make it a strong level — one worth trading.
| Key reminder: treat every level as a zone, not an exact price. If you find yourself arguing about whether price ‘touched’ your line by two pips, your line is in the wrong place. Good levels are obvious — they don’t require precise measurement. |
Two Ways to Trade Support and Resistance on Binany
Once you have your levels drawn, there are two distinct approaches to entering a trade. Each has its own entry timing, risk profile, and ideal expiry. Both are valid — which one you use depends on the context and your confidence in the level.
| Factor | Bounce Strategy | Breakout Retest Strategy |
| Entry timing | At the level, on rejection candle | After close beyond level, on retest |
| Risk | Moderate — level may not hold | Lower — direction already confirmed |
| Signal frequency | Higher — more setups appear | Lower — requires additional patience |
| Best for | Short expiry (5–15 min on M5) | Medium expiry (15–30 min on M15) |
| Candle required | Pin bar, hammer, engulfing at level | Any close beyond level + retest candle |
| Beginner friendly? | Yes — once levels are correctly drawn | Yes — easier to see direction clearly |
The Bounce Strategy
The bounce strategy enters a trade when price touches a support or resistance level and immediately shows rejection. You’re not waiting for a breakout — you’re betting that the level holds and price reverses back in the opposite direction.
Here’s what a bounce entry looks like in practice. Imagine EUR/USD has tested the 1.0850 support level three times over the past two weeks. On the fourth approach, price drops to 1.0848 and forms a bullish pin bar — long lower wick, small body near the top, tiny upper nose. That rejection candle at a proven support zone is your entry signal. You open a Call trade and set expiry to 15–20 minutes (three to four M5 candles).
The bounce strategy is the most common approach for binary options with short expiry. It requires a clean rejection candle at the level — a pin bar, a hammer, a bullish or bearish engulfing candle. Without that candlestick confirmation, you’re guessing. For more detail on identifying rejection candles, see our pin bar strategy guide on Binany.
The Breakout Retest Strategy
The breakout retest approach is more conservative. Instead of entering at the level, you wait for price to close beyond the level, then enter when price comes back to retest it from the other side. This is where the important rule — resistance turned support — applies in practice.
Here’s the scenario: EUR/USD has been struggling to break through 1.0900 resistance for several days. On Tuesday, a strong bullish candle closes above 1.0900 with conviction. You don’t enter immediately. Instead, you wait. Price pulls back to 1.0900 — now acting as support rather than resistance — and forms a small bullish candle confirming the level holds. That’s your entry: a Call trade with a 30-minute expiry.
The breakout retest strategy has a lower false signal rate because you have two pieces of confirmation: the break itself and the retest. The downside is that not every breakout retests cleanly — sometimes price accelerates away without giving you the entry. That’s a trade you miss, not a trade you chase.
How to Filter False Breakouts at Key Levels
A false breakout happens when price briefly pierces a level — triggering the entry signals of breakout traders — then reverses sharply back into the range. It’s one of the most common traps in trading, and it’s particularly dangerous for binary options traders who enter immediately on any close beyond the level.
Here’s why false breakouts occur: institutional traders often push price through a key level intentionally to trigger the stop-loss orders and breakout entries of retail traders. Once those orders are filled, they reverse direction, taking liquidity from the trapped traders. The spike through the level is the trap; the reversal is the real move.
Three filters reduce your exposure to false breakouts:
- Wait for a full candle close beyond the level. A wick through the level doesn’t count. Price must open and close beyond the zone on the timeframe you’re using. A M15 wick through resistance that closes back below is a failed breakout — not a signal.
- Look for the retest before entering. As described in the breakout strategy above, wait for price to return to the broken level and confirm it now acts as support (former resistance) or resistance (former support). This retest confirms the break was real.
- Check higher timeframe alignment. If the M15 chart shows a breakout above resistance, but the H1 chart shows a major resistance zone directly above, the M15 breakout may stall and reverse at the H1 level. Higher timeframe levels override lower timeframe signals in a conflict.
| False breakout rule of thumb: if price closes back through the level it just broke within two candles, treat it as a failed breakout and exit the trade idea. The support becomes resistance rule works in both directions — and quickly. |
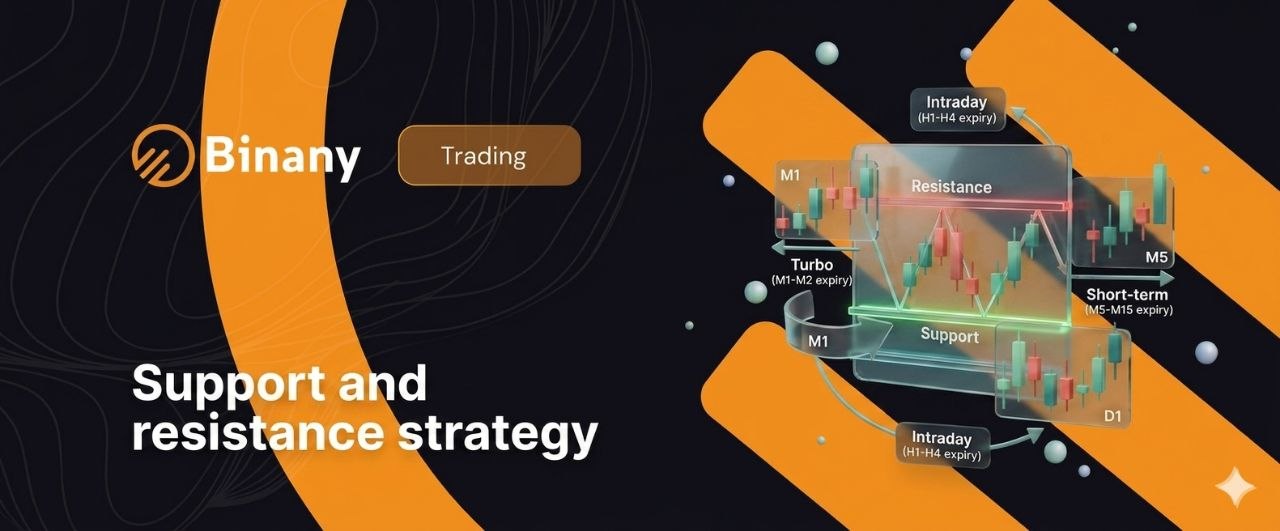
Best Timeframes for Support and Resistance on Binany
The timeframe you use to draw your levels and the timeframe you use to enter are different — and keeping them separate is essential for clean, reliable setups.
| Chart for Drawing Levels | Chart for Entry | Expiry Range | Best For |
| H1 (1-hour) | M5 or M15 | 5–30 minutes | Beginners — clear, uncluttered levels |
| M30 | M5 or M15 | 10–30 minutes | Active sessions, more setups |
| H4 or Daily | M30 or H1 | 1–3 hours | Stronger, longer-lasting levels |
The top-down approach works like this: you open the H1 chart and mark the four to six most significant horizontal levels. These are your map. Then you drop to M15 to watch price approach one of those levels. When you see a rejection candle or a clean breakout on M15, that’s your entry signal — already anchored to a level that matters on the higher timeframe.
Round number levels deserve special attention within this framework. Prices like 1.1000, 1.0800, 1.0500, or $2,000 on gold attract significant institutional interest and tend to act as natural support and resistance zones even without a long history of bounces. If your drawn level happens to align with a round number, consider that a stronger level than one that doesn’t.
Avoid drawing levels exclusively on M5 or M1 charts. The levels are real to price action on that timeframe, but they carry little weight and fail often when a higher-timeframe move overrides them.
How to Confirm a Support or Resistance Level Before Trading
Not every horizontal line on your chart deserves a trade. Before committing capital to a support or resistance bounce or breakout, run through these four confirmation checks:
| Confirmation Signal | What It Looks Like | Strength |
| Tested 2+ times | Price bounced off same zone at least twice before | Essential |
| Rejection candle | Pin bar, hammer, or engulfing at the level | Strong |
| Round number alignment | Level sits near $1.0800, $1.1000, $1.2000, etc. | Moderate |
| Higher timeframe visible | Same level appears clearly on H1 or H4 chart | Strong |
| Level has history | Zone caused reversals over multiple weeks | Very strong |
A strong support level trading setup looks like this: price has bounced from 1.0850 three times over six weeks. That zone aligns with the round number 1.0850. The level is clearly visible on both M30 and H1. On the fourth approach, a bullish pin bar forms. All four confirmation signals are present. That’s a high-confidence trade.
Contrast that with a level tested only once, visible only on M15, with no round number alignment, and no rejection candle — just price approaching the zone. That setup doesn’t pass the confirmation test. No trade.
Common Mistakes When Trading Support and Resistance
These are the errors that consistently reduce win rates for traders working with key levels:
- Drawing too many levels. When every minor swing high gets a line, the chart becomes unreadable. Stick to four to six significant levels per asset. If your chart has more than eight horizontal lines, you’ve drawn too many — most of them won’t matter.
- Entering before confirmation. Price approaching a support level is not an entry signal. Price forming a rejection candle at that support level is. Wait for the candle to close, check the candlestick structure, then enter. Never enter mid-candle.
- Ignoring the overall trend direction. A bullish pin bar at support in a strong downtrend is a counter-trend signal — it has a lower probability of success than the same signal in an uptrend. Always check the broader trend context before entering a bounce trade.
- Treating levels as exact lines. If your level is at 1.0850 and price dips to 1.0843 before bouncing, that’s still a valid bounce. Price regularly overshoots levels by a few pips before reversing. A zone of 1.0840–1.0860 is more realistic than a single exact price.
- Not updating levels as the market evolves. A level that held six months ago may no longer be relevant. Regularly review your chart markings and remove levels that price has clearly moved through without reaction. Markets evolve, and your map needs to evolve with them.
Conclusion
Support and resistance trading comes down to two core skills: identifying where the market has made decisions before, and recognizing when price is about to make the same decision again. The bounce strategy gives you entries when price touches a level and shows rejection. The breakout retest strategy gives you entries after a level breaks and price confirms the new direction.
Both approaches work — what determines your success is how carefully you draw your levels, how patiently you wait for confirmation, and how consistently you filter out the low-quality setups that look like opportunities but aren’t.
Open your Binany demo and start marking up your charts today. Pick one asset, open the H1 chart, and identify four to six clear horizontal levels. Then drop to M15 and watch how price behaves when it approaches those zones. For a deeper understanding of the candlestick signals used with these levels, Investopedia’s guide to support and resistance is a useful reference to read alongside your chart practice.
FAQ: Support and Resistance Strategy on Binany
Q: What is support and resistance in trading?
Support is a price zone where buying pressure consistently outweighs selling pressure, causing price to bounce upward. Resistance is the opposite — a zone where sellers overpower buyers, pushing price back down. These levels form at previous swing highs and lows, round numbers, and areas of historical price congestion, and they tend to repeat their influence over time.
Q: How do you draw support and resistance levels correctly?
Follow these four steps:
- Switch to H1 or M30 to see the most significant levels without noise.
- Mark the obvious swing highs and swing lows — the clear turning points where price reversed direction.
- Draw horizontal lines through price clusters where multiple highs or lows group near the same zone.
- Keep only levels that have been tested at least twice. Anything tested once is a candidate; twice or more is confirmed.
Q: What is the best timeframe for support and resistance trading?
Draw your levels on H1 or M30 — these timeframes show meaningful price structure without too much noise. Enter your trades on M5 or M15 based on those higher-timeframe levels. This top-down approach gives you levels that carry real weight while providing precise entries with appropriate expiry windows for binary options on Binany.
Q: How do you trade support and resistance on Binany?
Two approaches work reliably:
- Bounce strategy: wait for price to reach a support or resistance level and form a rejection candle (pin bar, hammer, or engulfing). Enter in the opposite direction with a 15–30 minute expiry.
- Breakout retest strategy: wait for a candle to fully close beyond a level, then enter when price returns to test the broken level from the other side. This confirms the breakout was real and the level has flipped.
- In both cases: only trade at levels that have been tested at least twice, and always wait for a candlestick signal before entering — never enter just because price is near a level.

Financial writer and market analyst with a passion for simplifying complex trading concepts. He specializes in creating educational content that empowers readers to make informed investment decisions.